Sunday, August 26, 2012
Brushed Metal Perfection forum size
Brushed Metal Perfection
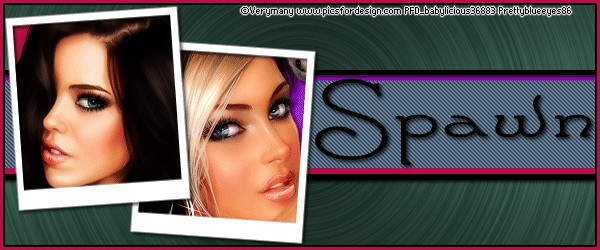
I used PSP9 to make this tag, but it should work in all versions
Animation Shop
Supplies Needed
2 Closeup Tube of choice: I used the close ups by Very Many which were purchased from Pics For Design.
PLEASE NOT DOT use these tubes without obtaining a license number first.
Template- I used SpawnFSTemplate047 by Dave aka Spawn. You can download this template from his blog HERE
Fonts Used: Pixelade and Santa's Sleigh
Filters
Eyecandy 5 Impact- Brushed Metal
Lets Get Started!!
Open up template
Shift+D and then close original
Delete the credits layer
Click the Left photo grey inside layer
Select all, float and defloat
copy and paste close up tube of choice
selections invert, delete,select none
Click the Left photo grey inside layer again
Select all, float and defloat
Layers, new raster layer
floodfill with a medium colour from tube
Select none and delete the Left photo grey inside layer
Duplicate your tube layer, adjust, blur, gaussian Blur 5.00
adjust, soften, soften more, and change the blend mode to softlight
Dropshadow your original layer
If you have excess blur outside of the photo. magic wand your background layer of the frame,
selections, invert and hit delete on your tube layer. select none.
Click theright photo grey inside layer
Select all, float and defloat
copy and paste close up tube of choice
selections invert, delete,select none
Click the right photo grey inside layer again
Select all, float and defloat
Layers, new raster layer
floodfill with a medium colour from tube
Select none and delete the right photo grey inside layer
Duplicate your tube layer, adjust, blur, gaussian Blur 5.00
adjust, soften, soften more, and change the blend mode to softlight
Dropshadow your original layer
If you have excess blur outside of the photo. magic wand your background layer of the frame,
selections, invert and hit delete on your tube layer. select none.
Select the main background layer, select all
layers new raster layer
Select one colour of choice and flood fill
delete the main background layer
Duplicate the new layer 2 times for a total of 3 layers.
On the original, use the following Eyecandy 5 Impact- Brushed Metal Settings
(please note, you will need to change the Metal colour to the colour you flood filled with)CLICK THE PREVIEW TO VIEW THE SETTINGS
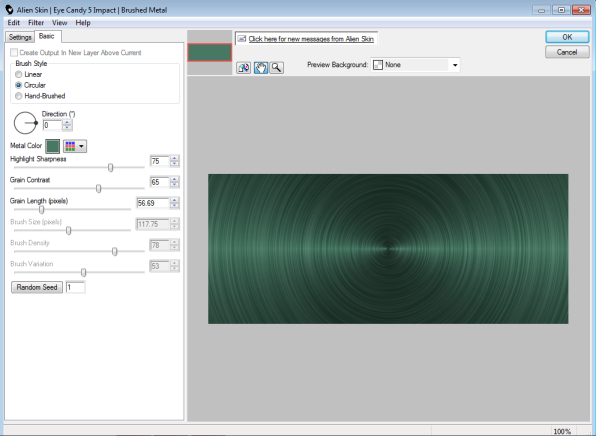
Repeat for the 2 duplicate layers, but change the random seed each time
Hide the 2 duplicate layers
Select the middle Black strip layer
Select all, float and defloat
layers, new raster layer and floodfill with colour of choice
Use the following Penta-Jeans settings
Amount-64
Border Width-4
Select none and delete the middle black strip layer
Drop shadow of choice on the Left and Right Photo Frame Layers
Merge together the white background strips
select all, float, defloat
layers, new raster layer and fill with gradient of choice
Select none and delete the white background strips
Drop shadow the outer black strips layer.
Click the top layer
Select all, Layers, new raster layer
Selections, modify, contract by 5
Selects invert and flood fill with Black
keep selected, selections, modify, contract by 3
layers, new raster layer and floodfill with colour from tube
Select none.
Now is the time to add ©Information and your name
I used Pixelade size 10 for my © Information and added a gradient glow
I then used Santa's Sleigh, Black size 72 and stretched it out
I then used Santa's Sleigh, Black size 72 and stretched it out
Open up animation shop
In psp, make sure the duplicate layers are hidden, edit, copy merged
Paste as a new animation in animation shop
back to psp, hide the first brushed metal layer and unhide the 1st duplicate
edit, copy merged
paste after current animation in animation shop
back to psp, hide the first duplicate layer and unhide the 2nd duplicate
edit, copy merged
paste after current animation in animation shop
In animation shop
File, save as
and follow the prompts to save your tag.
Before you close your tag in paint shop, make sure you save a backup incase you are offering your tag as a WWO: )
and your done..
Thankyou for trying my tutorial.
This tutorial was written by Shmelly aka Prettyblueeyes86 on the 27th August 2012
Please do not claim as your own.
Results below are from my friend Paula :)

Results below are from my friend Paula :)
Subscribe to:
Post Comments (Atom)
My Banner
Please snag :)

People I CT for


About Me

- Shmelly aka Prettyblueeyes86
- Hi all. Im Shmelly aka prettyblueeyes86. I am 26yrs old and live in Australia with my partner, our daughters Skye and Emily and our pets. If you would like to contact me prettyblueeyes86@hotmail.com
Influenster

1 comments:
Thank you so much for creating this and sharing it with us.
I will be featuring this tutorial on Taggers Lounge as part of our weekly Forum Set Challenge.
Iwill be providing a link there back to this blog.
Hugs
Post a Comment