Wednesday, December 26, 2012
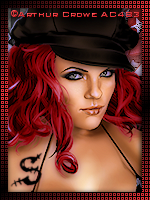
Arthur Crowe- New Year PTU +Snags
Tag made using the art of Arthur Crowe and a scrapkit called New Year from Soxsational Scraps. The Scrapkit is part of a mega scrapkit called Happy Freaking Everything.
Snags are below


Thursday, October 18, 2012
Tamandya- Trick or Treat PTU + SNAGS
Made this tag using the art of Tamandya from Pics For Design and a scrapkit called Trick or Treat by Soxsational Scraps.
There is some snags below :)


There is some snags below :)
Sunday, October 14, 2012
Elias Chatzoudis- Spooky Wooky Snags- PTU
Made this tag using the art Elias Chatzoudis, his art can be purchased from Elias Art Shop and a scrapkit called Spooky Wooky by Soxsational Scraps.
There is some snags below :)


There is some snags below :)
Monday, October 1, 2012
Alex Prihodko-Halloween Nightmare-PTU
Made this tag using the art of Alex Prihodko and a scrapkit called Halloween Nightmare by Soxsational Scraps.
Friday, September 28, 2012
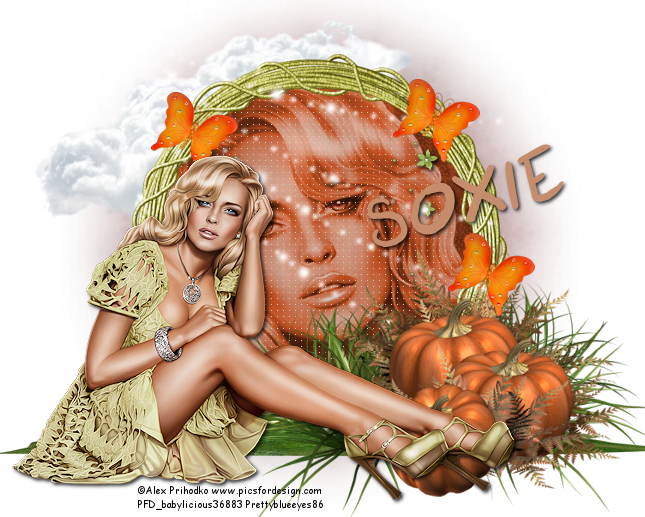
Alex Prihodko Autumn Romance- PTU
I used PSPX5 to make this tag, but it should work in all versions
Supplies Needed
Tube and Closeup of choice- I used the gorgeous art of Alex Prihodko. You can purchase his art from Pics For Design. Please note, you MUST have a license to use any art purchased from Pics for Design
Scrapkit- I used a gorgeous scrapkit by Soxsationsal Scraps called Autumn Romance. Thankyou Soxie. This kit can be downloaded from various stores, for more information pop by Soxies BLOG.
Mask- I used a mask called Horseplays Pasture Mask 25 by HorsePlays Pasture
Font- I used Autumn Whispers
Lets Get Started!
Open up a new transparent image 650 x 650
Open up Frame1 and paste as a new layer, resize by 70%
Select your magic wand and click inside the frame
Selections, modify, expand by 10
Copy and paste paper of choice as a new layer (I used Paper4)
Selections invert and hit delete, Selections None
Move your paper layer below the frame
Magic wand inside of the frame again (making sure you are on the frame layer)
Selections, modify, expand by 10
Copy and paste close up of choice as a new layer
Selections invert and hit delete, Selections None
Move your closeup layer below the frame
On your closeup layer
Effects, texture effect, Weave with the following settings
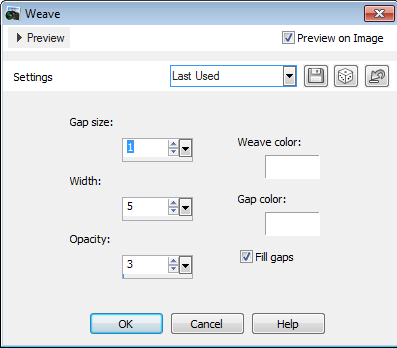
Change the blend mode to luminance and the opacity to about 70%
Copy and paste a new paper of choice as a new layer
Move this layer to the bottom
Layers, Load Mask from Disk
Select mask and click ok
Merge group and resize by 80%
Copy and paste the cloud as a new layer
image, free rotate left by 15%
Move this above the mask layer but below every other layer
sit it to the top left of the frame
Copy and paste the lawn as a new layer
move it just above the cloud layer
and position at the bottom of the frame
Copy and paste the pumpkins as a new layer
resize by 50% and position to the right bottom left on the frame and lawn
Copy and paste the grass as a new layer
resize, duplicate, mirror and merge down
move these 2 layers behind the pumpkins layer
Copy and paste the sparkle as a new layer
move this to the top and sit it across the tag
Copy and paste the butterfly as a new layer
resize and duplicate a couple of times
place them around your frame layer
drop shadow each butterfly with shadow of choice
Copy and paste tube of choice
Resize if needed and position at the bottom of frame so she is half sitting on the lawn layer
Dropshadow of choice
add©Information and text of choice
Crop and resize your tag if needed
File save as
Before closing psp, make sure you save a backup of your tag
Thankyou for trying my tutorial :)
This tutorial was written by Shmelly aka Prettyblueeyes86 on 29th September 2012
Please DO NOT claim as your own
Wednesday, September 26, 2012
Woohoo Update
Ive just been accepted as part of the Creative Team for Soxsational Scraps. A big thankyou to Tracey aka Soxie for giving me this opportunity!!
Make sure you all visit here over at Soxsational Scraps!!!
Sunday, September 23, 2012
PSP Party Central
To all my psping buddies, come join PSP Party Central :) I have just been made a challenge host there and would love for you all to join us :)
There is daily and weekly challenges, daily clicks, fun contests and awesome members and staff
http://psp-party.com/PPC/index.php
There is daily and weekly challenges, daily clicks, fun contests and awesome members and staff
http://psp-party.com/PPC/index.php
Sunday, August 26, 2012
Brushed Metal Perfection forum size
Brushed Metal Perfection
I used PSP9 to make this tag, but it should work in all versions
Animation Shop
Supplies Needed
2 Closeup Tube of choice: I used the close ups by Very Many which were purchased from Pics For Design.
PLEASE NOT DOT use these tubes without obtaining a license number first.
Template- I used SpawnFSTemplate047 by Dave aka Spawn. You can download this template from his blog HERE
Fonts Used: Pixelade and Santa's Sleigh
Filters
Eyecandy 5 Impact- Brushed Metal
Lets Get Started!!
Open up template
Shift+D and then close original
Delete the credits layer
Click the Left photo grey inside layer
Select all, float and defloat
copy and paste close up tube of choice
selections invert, delete,select none
Click the Left photo grey inside layer again
Select all, float and defloat
Layers, new raster layer
floodfill with a medium colour from tube
Select none and delete the Left photo grey inside layer
Duplicate your tube layer, adjust, blur, gaussian Blur 5.00
adjust, soften, soften more, and change the blend mode to softlight
Dropshadow your original layer
If you have excess blur outside of the photo. magic wand your background layer of the frame,
selections, invert and hit delete on your tube layer. select none.
Click theright photo grey inside layer
Select all, float and defloat
copy and paste close up tube of choice
selections invert, delete,select none
Click the right photo grey inside layer again
Select all, float and defloat
Layers, new raster layer
floodfill with a medium colour from tube
Select none and delete the right photo grey inside layer
Duplicate your tube layer, adjust, blur, gaussian Blur 5.00
adjust, soften, soften more, and change the blend mode to softlight
Dropshadow your original layer
If you have excess blur outside of the photo. magic wand your background layer of the frame,
selections, invert and hit delete on your tube layer. select none.
Select the main background layer, select all
layers new raster layer
Select one colour of choice and flood fill
delete the main background layer
Duplicate the new layer 2 times for a total of 3 layers.
On the original, use the following Eyecandy 5 Impact- Brushed Metal Settings
(please note, you will need to change the Metal colour to the colour you flood filled with)CLICK THE PREVIEW TO VIEW THE SETTINGS
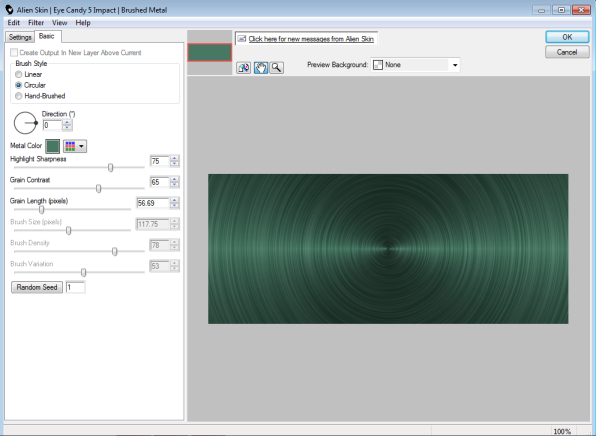
Repeat for the 2 duplicate layers, but change the random seed each time
Hide the 2 duplicate layers
Select the middle Black strip layer
Select all, float and defloat
layers, new raster layer and floodfill with colour of choice
Use the following Penta-Jeans settings
Amount-64
Border Width-4
Select none and delete the middle black strip layer
Drop shadow of choice on the Left and Right Photo Frame Layers
Merge together the white background strips
select all, float, defloat
layers, new raster layer and fill with gradient of choice
Select none and delete the white background strips
Drop shadow the outer black strips layer.
Click the top layer
Select all, Layers, new raster layer
Selections, modify, contract by 5
Selects invert and flood fill with Black
keep selected, selections, modify, contract by 3
layers, new raster layer and floodfill with colour from tube
Select none.
Now is the time to add ©Information and your name
I used Pixelade size 10 for my © Information and added a gradient glow
I then used Santa's Sleigh, Black size 72 and stretched it out
I then used Santa's Sleigh, Black size 72 and stretched it out
Open up animation shop
In psp, make sure the duplicate layers are hidden, edit, copy merged
Paste as a new animation in animation shop
back to psp, hide the first brushed metal layer and unhide the 1st duplicate
edit, copy merged
paste after current animation in animation shop
back to psp, hide the first duplicate layer and unhide the 2nd duplicate
edit, copy merged
paste after current animation in animation shop
In animation shop
File, save as
and follow the prompts to save your tag.
Before you close your tag in paint shop, make sure you save a backup incase you are offering your tag as a WWO: )
and your done..
Thankyou for trying my tutorial.
This tutorial was written by Shmelly aka Prettyblueeyes86 on the 27th August 2012
Please do not claim as your own.
Results below are from my friend Paula :)

Results below are from my friend Paula :)
Thursday, August 23, 2012
Thankyou
I just wanted to say a big thankyou to Jackie of Jackie's Jewels for my awesome blog layout!!!
Sunday, August 19, 2012
Copyright Compliant Award from The Zone Groups!
Look what I recieved from The Zone Groups :)
Once my blog is finished being beautified I will have this permantly on my blog
Thursday, August 16, 2012
Jose Swirls Forum Tag
Jose Swirls Forum Tag
I used PSP 9 to make this tag, but it should work in all versions
Animation Shop
Supplies Needed
Tube and Close up of choice- I used a tube and closeup by Jose Cano which can be purchased from Scraps and the City
Please Note, YOU MUST have a license to use any art purchased from Scraps and the City
Template: I used SpawnsFSTemplate058 made by Dave Aka Spawn. You can download this template and many more from his blog HERE
Fonts Used: Pixelade and Janda Swirlygirl
Filters Needed
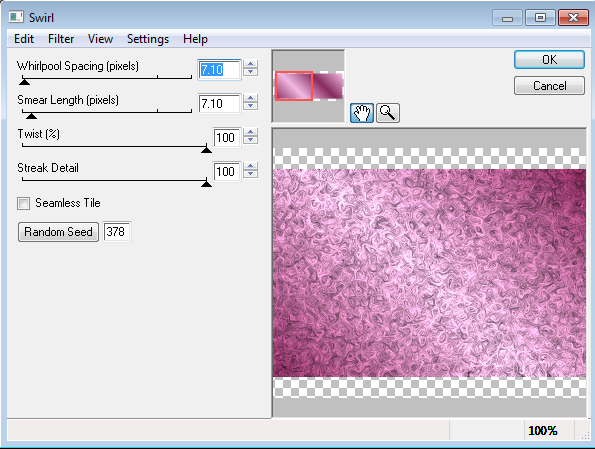
Eyecandy 4000- Swirl
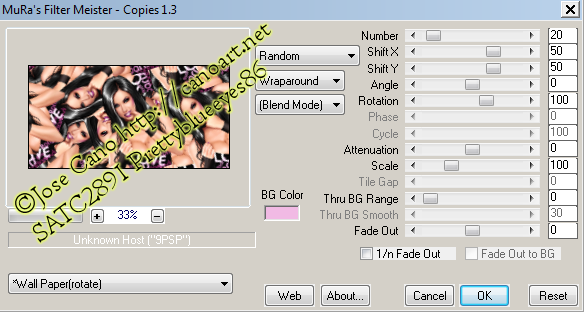
Mura Meisters-Copies
Lets Get Started!
Open up the template
Shift+D and then close original
Delete the credits layer
Using the dropper tool, select a dark colour of choice and set it as your background
Select the main background layer, select all
Layers, New Raster layer
and flood fill with the above colour
Effects, texture effects, blinds with the following settings
Width-3
Opacity-29
Black
both boxes checked
Width-3
Opacity-29
Black
both boxes checked
adjust, add/remove noise, add noise
Uniform 15% and monochrome checked
Select None and Delete the main background layer
Delete the Outer Black Dots Layer.
Select the Light Grey Foreground layer
Select all, float and defloat
Layers new raster layer
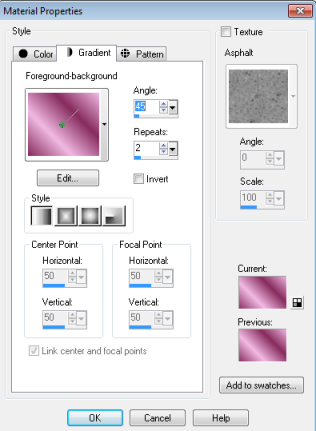
Flood fill with a gradient of choice
I used the following
Keep selected and duplicate your new layer 2 times for a total of 3 layers
On the first layer use the following Eyecandy 4000 Swirl Settings
When in the swirl, click settings and click Small and twisty, use the default settings
On the first duplicate, repeat the above settings but click random seed and ok
On the second duplicate, repeat and click random seed once and ok
Select none and hide the 2 duplicate layers
Delete the Light Grey Foreground Layer
Copy and paste your close up as a new layer
Resize by 50%
Mura Meisters Copies with the following settings
Crop 600 x 250
Select the Darker Grey Foreground layer
Select all, float and defloat
Selections invert and hit delete on your mura copies layer
select none
Change the blend mode to luminance (L)
Paste your tube as a new layer, position to where you like.
I placed mine to the right and under the border layer
Drop Shadow. I used 2,2,80, 5.00 Black
Crop 600 x 250
If you do not want a white border
Select all, float, defloat
layers, new raster layer and floodfill with colour of choice.
Select none and delete the white border layer
Now is the time to add ©Information and your name
For the ©Information, I use Pixelade, size 10 and Black and give it a gradient glow
For the name, I used Janda Swirlygirl size 72 and colour from my tube.
I also gave it a slight gradient glow and drop shadow
Open up animation shop
In psp, make sure the duplicate layers are hidden, edit, copy merged
Paste as a new animation in animation shop
back to psp, hide the first swirl layer and unhide the 1st duplicate
edit, copy merged
paste after current animation in animation shop
back to psp, hide the first duplicate layer and unhide the 2nd duplicate
edit, copy merged
paste after current animation in animation shop
In animation shop
File, save as
and follow the prompts to save your tag.
Before you close your tag in paint shop, make sure you save a backup incase you are offering your tag as a WWO: )
and your done..
Thankyou for trying my tutorial.
This tutorial was written by Shmelly aka Prettyblueeyes86 on the 16th August 2012
Please do not claim as your own.
The tag below was made by my friend Paula
The tag below was made by my friend Paula
Wednesday, August 15, 2012
Zlata Fritillary Tutorial
Zlata Fritillary
I used PSP9 to make this tag, but it should work in all versions
Animation Shop
Supplies Needed
Tube of choice: I used a tube by Zlata M which can be purchased from The PSP Project.
Please note you must have a license to use any art purchased from The PSP Project.
Template- I used SpawnFSTemplate061 by Dave aka Spawn. You can download this template from his blog HERE
Fonts Used: Pixelade and Delicious Curls
Filters
DSB Flux- Bright Noise and Xero- Fritillary
DSB Flux- Bright Noise and Xero- Fritillary
Lets Get Started!!
Open up template
Shift+D and then close original
Delete the credits layer
Delete the Light stripes dot, Dark Stripe dots and the all stripes background layers
Select the dark stripes layer
select all, float, defloat
layers, new raster layer
flood fill with a dark colour from your tube (I used a dark colour)
select none and delete the dark stripes layer.
Keep the layer you just filled active
DSB Flux- Bright noise
35 and Mix, click ok
Select the medium stripes layer
select all, float, defloat
layers, new raster layer
flood fill with a medium colour from your tube
keep selected but delete the medium stripes layer.
Duplicate 2 times for a total of 3 layers
first layer use the following Xero- Fritillary Settings (please click the image)
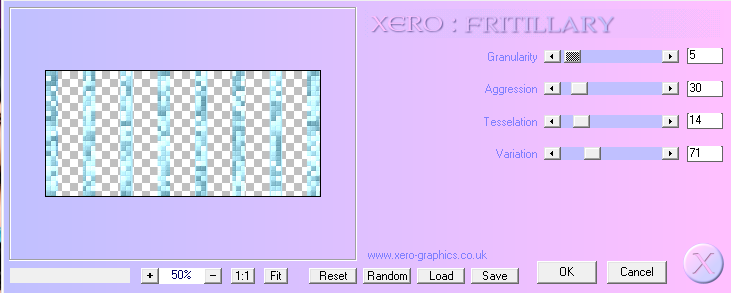
On the 2nd layer, repeat but change the variation to 61
On the 3rd layer, repeat and change the variation to 51
Select none and hide the 2 duplicate layers
Select the light stripes layer
select all, float, defloat
layers, new raster layer
flood fill with another colour from your tube or your choice.
Select none and delete the light stripes layer
On the light stripes layer
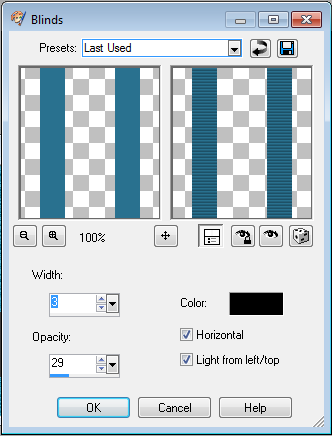
Effects, texture effects, and blinds
Use the following settings
Select the dark grey horizontal line layer
Select all, float and defloat
layers, new raster layer
Floodfill with black or colour of choice.
Select none and delete the dark grey horizontal line layer
Copy and paste your close up as a new layer
position in the middle of the working image
change the opacity to 47%
Go to your crop tool
Width 600 and Height 250. click the tick
Copy and paste your tube
Image, mirror
Drop Shadow 2,2,80, 5.00 black
Go to your crop tool
Width 600 and Height 250. click the tick
Select all, selections, modify, contract by 5
layers, new raster layer
selections, invert and flood fill with colour of choice
Select none
Now is the time to add ©Information and your name
I used Pixelade size 10 for my © Information and added a gradient glow
For the name, I used Delicious Curls, size 72 and Black
Open up animation shop
In psp, make sure the duplicate layers are hidden, edit, copy merged
Paste as a new animation in animation shop
back to psp, hide the first fritillary layer and unhide the 1st duplicate
edit, copy merged
paste after current animation in animation shop
back to psp, hide the first duplicate layer and unhide the 2nd duplicate
edit, copy merged
paste after current animation in animation shop
In animation shop
File, save as
and follow the prompts to save your tag.
Before you close your tag in paint shop, make sure you save a backup incase you are offering your tag as a WWO: )
and your done..
Thankyou for trying my tutorial.
This tutorial was written by Shmelly aka Prettyblueeyes86 on the 15th August 2012
Please do not claim as your own.
Results from Friends
This forum set was made by Paula


Results from Friends
This forum set was made by Paula

Sunday, July 15, 2012
Wordart

This wordart was made as a forum exclusive in The Creative Chicks
To download please join the forum, and whilst your at it, participate in some challenges. A great group to be a part of :)
Template
This template was made as a forum exclusive in The Creative Chicks
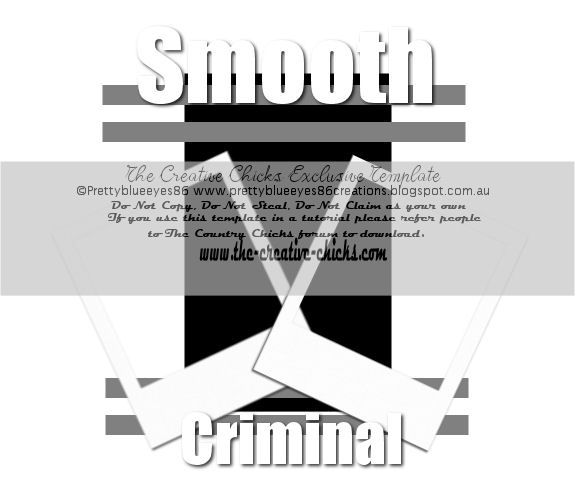
To download please join the forum, and whilst your at it, participate in some challenges. A great group to be a part of :)
Saturday, July 7, 2012
New Beginnings
Welcome to Prettyblueeyes86 Creations :)
Here I will put anything I make, such a templates, scrapkits and masks. Posts may be few but Ive only just returned to the land of psp. My first template will be coming soon :)
Here I will put anything I make, such a templates, scrapkits and masks. Posts may be few but Ive only just returned to the land of psp. My first template will be coming soon :)
Subscribe to:
Posts (Atom)
My Banner
Please snag :)

People I CT for


About Me
- Shmelly aka Prettyblueeyes86
- Hi all. Im Shmelly aka prettyblueeyes86. I am 26yrs old and live in Australia with my partner, our daughters Skye and Emily and our pets. If you would like to contact me prettyblueeyes86@hotmail.com
Influenster
